이번엔 Bootstrap을 이용하여 버튼을 이용하겠다.
 <a href='' class="btn btn-outline-primary">More</a>
    <a href='' class="btn btn-success">More2</a>
    <a href='' class="btn btn-info">More3</a>
body 태그에 이것을 넣어줄 것이다.
넣으면
<html>
    <head>
<meta http-equiv="Content-type" content="text/html; charset=utf-8">
<link rel="stylesheet" href="https://stackpath.bootstrapcdn.com/bootstrap/4.1.3/css/bootstrap.min.css">
<script src="https://code.jquery.com/jquery-3.3.1.slim.min.js"></script>
<script src="https://cdnjs.cloudflare.com/ajax/libs/popper.js/1.14.3/umd/popper.min.js"></script>
<script src="https://stackpath.bootstrapcdn.com/bootstrap/4.1.3/js/bootstrap.min.js"></script>
    </head>
    <body>
        <a href='' class="btn btn-outline-primary">More</a>
    <a href='' class="btn btn-success">More2</a>
    <a href='' class="btn btn-info">More3</a>
    </body>
</html>
다음과 같다 이제 실행시키면?

다음과 같이 나온다.
btn-outline을 쓰면 외각선만 나오게된다.
btn-success는 주로 초록색 버튼
btn-info 는 하늘색 버튼이 나온다.
이제 앞으로
 <head>
    <meta http-equiv="Content-type" content="text/html; charset=utf-8">
        <link rel="stylesheet" href="https://stackpath.bootstrapcdn.com/bootstrap/4.1.3/css/bootstrap.min.css">
<script src="https://code.jquery.com/jquery-3.3.1.slim.min.js"></script>
<script src="https://cdnjs.cloudflare.com/ajax/libs/popper.js/1.14.3/umd/popper.min.js"></script>
<script src="https://stackpath.bootstrapcdn.com/bootstrap/4.1.3/js/bootstrap.min.js"></script>
    </head>
이 부분은 무조건 복붙해놓고 시작해야한다.
이제 새롭게 index.html말고 새로운 html을 만들어 연동시키자.

필자는 이렇게 많이 만들었지만 간단하게 index.html과 form.html을 연동시키는 법을 알려주겠다.
이 방법을 배우면 다른거 연동시키는건 쉽다.
<html>
    <head>
    <meta http-equiv="Content-type" content="text/html; charset=utf-8">
        <link rel="stylesheet" href="https://stackpath.bootstrapcdn.com/bootstrap/4.1.3/css/bootstrap.min.css">
<script src="https://code.jquery.com/jquery-3.3.1.slim.min.js"></script>
<script src="https://cdnjs.cloudflare.com/ajax/libs/popper.js/1.14.3/umd/popper.min.js"></script>
<script src="https://stackpath.bootstrapcdn.com/bootstrap/4.1.3/js/bootstrap.min.js"></script>
    </head>
    <body>
     아이디<input type=text class='form-control'>
     패스워드<input type=password class='form-control'> <br>
    <a href=' ' class="btn btn-success">로그인</a>
    <a href=' ' class="btn btn-info">회원가입</a>
    </body>
</html>
이렇게 써보자!!
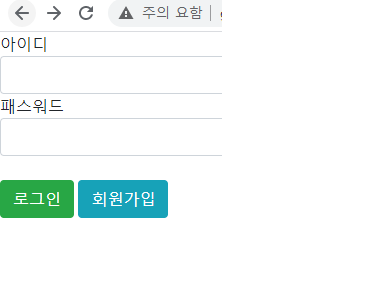
그러면

다음과 같이 만들어진다.
class='form-control'을 쓰면 입력할 수 있는 칸이 스마트폰이면 스마트폰 PC라면 PC에 맞게 사이즈가 바뀌어 출력된다.
이게 바로 Bootstrap의 장점이고 우리가 그냥 가져다가 쓰기만하면 편하게 반응형 웹을 구축할 수 있다.
근데 여기서 로그인 버튼과 연동시켜야 하지 않겠는가?
<html>
    <head>
    <meta http-equiv="Content-type" content="text/html; charset=utf-8">
        <link rel="stylesheet" href="https://stackpath.bootstrapcdn.com/bootstrap/4.1.3/css/bootstrap.min.css">
<script src="https://code.jquery.com/jquery-3.3.1.slim.min.js"></script>
<script src="https://cdnjs.cloudflare.com/ajax/libs/popper.js/1.14.3/umd/popper.min.js"></script>
<script src="https://stackpath.bootstrapcdn.com/bootstrap/4.1.3/js/bootstrap.min.js"></script>
    </head>
    <body>
         아이디<input type=text class='form-control'>
     패스워드<input type=password class='form-control'> <br>
    <a href=' ' class="btn btn-success">로그인</a>
    <a href='form.html' class="btn btn-info">회원가입</a>
    </body>
</html>
form.html과 연동시키기 위해 회원가입 부분 앵커태그에 href='form.html'을 적었다.
<html>

<head>
<meta http-equiv="Content-type" content="text/html; charset=utf-8">
<meta name="viewport" content="width=device-width, initial-scale=1, maximum-scale=1, user-scalable=0">
<link rel="stylesheet" href="https://stackpath.bootstrapcdn.com/bootstrap/4.1.3/css/bootstrap.min.css">
<script src="https://code.jquery.com/jquery-3.3.1.slim.min.js"></script>
<script src="https://cdnjs.cloudflare.com/ajax/libs/popper.js/1.14.3/umd/popper.min.js"></script>
<script src="https://stackpath.bootstrapcdn.com/bootstrap/4.1.3/js/bootstrap.min.js"></script>


 <body>
     아이디<input type=text class='form-control'>
      <a href='' class="btn btn-success">아이디 중복확인</a><br>
     패스워드<input type=password class='form-control'>
    패스워드 확인<input type=password class='form-control'>


        <label><input type="radio" name=item> 남자</label>
     <label><input type="radio" name=item> 여자</label> <br>
       <label><input type="checkbox" > 웹 프론트엔드 경험</label><br>
      <label><input type="checkbox"  > 웹 백엔드 경험</label><br>

      <a href='index.html' class="btn btn-success">가입하기</a>

 </body>
</head>
form.html에는 다음과 같이 기입해라.
그러면
여기서 회원가입을 눌렀을 때
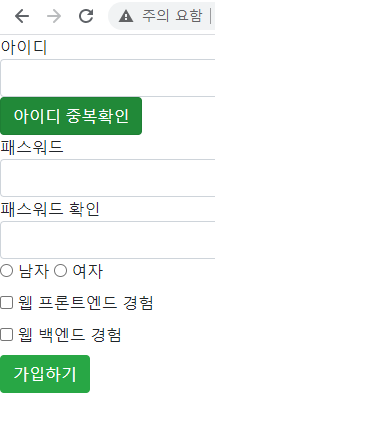
이런식으로 출력이 된다.
이제 코딩을 설명하겠다.
 <label><input type="radio" name=item> 남자</label>
 <label><input type="radio" name=item> 여자</label> <br>
radio 를 만든 것이다.
label 태그 사이에 input 태그를 써준다.
그때 input type="radio"로 해주면 동그란 체크공간이 생긴다.
둘 다 name=item 해준 이유가 무엇이냐면
name=item을 써주지 않으면 남자 여자 성별체크가 중복체크가 된다.
근데 성별을 두 개나 가질 수는 없지 않은가? 그래서 name=item을 써준다.
name=item을 써주면 남자 여자 둘 중 한 개만 체크가 되기 때문에 이렇게 하였다.
<label><input type="checkbox" > 웹 프론트엔드 경험</label><br>
  <label><input type="checkbox"  > 웹 백엔드 경험</label><br>
다음은 checkbox를 만든 것이다.
label 태그 사이에 input태그를 써준다.
input type="checkbox"로 해주면 네모난 체크박스가 생긴다.
이런 네모난 체크박스는 회원가입을 할 때 동의함 혹은 동의하지않음 할 때 많이 봤을 것이다.
체크박스는 name=item을 써주더라도 중복체크가 된다.
다음은 파일 첨부 공간을 만드는 방법이다.
모든 파일 첨부와, 사진 첨부 두가지로 나누어 설명하겠다.
<input type="file" name="FileName">이것을 넣으면 모든 파일 첨부
<input type="file" id="imgInp" name=file accept="image/png,image/jpeg" capture="camera">이것을 넣으면 사진 파일(jpg, png)이 첨부가능하다.
이 두 소스를 넣어보자.
<html>
    <head>
    <meta http-equiv="Content-type" content="text/html; charset=utf-8">
        <link rel="stylesheet" href="https://stackpath.bootstrapcdn.com/bootstrap/4.1.3/css/bootstrap.min.css">
<script src="https://code.jquery.com/jquery-3.3.1.slim.min.js"></script>
<script src="https://cdnjs.cloudflare.com/ajax/libs/popper.js/1.14.3/umd/popper.min.js"></script>
<script src="https://stackpath.bootstrapcdn.com/bootstrap/4.1.3/js/bootstrap.min.js"></script>
    </head>
    <body>
     <input type="file" name="FileName">
    <input type="file" id="imgInp" name=file accept="image/png,image/jpeg" capture="camera">
    </body>
</html>
구현 시키면

그냥 보기에는 두개가 차이가 없어보이지만 막상 눌러보면 다르다.
왼쪽은 모든 파일을 첨부할 수 있으며, 오른쪽은 사진파일만 첨부 가능하다.
이외에도 bootstrap에 여러 가지가 있으니 필요한 거 찾아서 내 껄로 만들도록 하자.
'기술노트 > 웹프론트엔드' 카테고리의 다른 글
| 웹 프론트엔드 강의(3) (0) | 2020.12.25 |
|---|---|
| 파일질라 설치 (0) | 2020.12.25 |
| 웹 프론트엔드 강의(1) (0) | 2020.12.25 |
| 웹호스팅을 통한 웹 프론트엔드 환경 구축 (0) | 2020.12.25 |
| Notepad++를 이용한 html강의(2) (0) | 2020.12.25 |